How to Recruit Slaves
Open the helmet interface by pressing T.
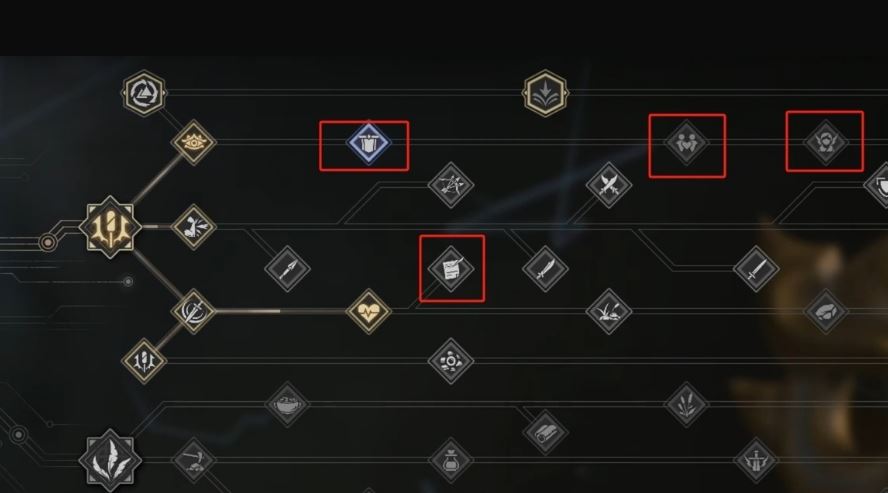
The second line relates to slave recruitment, with the following key points:
- Level 10: Learn Intimidation. After subduing humanoid monsters to a sliver of health, intimidate them to make them faint and be at your disposal.
- Level 15: Learn Summoning Slaves. After intimidating a slave, feed them to full satiety while they lie down to gradually increase loyalty. Once loyalty reaches 500, they can be summoned as a slave.
- Level 20: Increase the number of slaves.
- Level 25: Branch into learning Habit Perception. You can perceive the rank and attributes of slaves.
- Level 30: After defeating the Blade Beast in the Pyramid, gain credentials and materials to enter the Pyramid, unlocking control. You can possess a slave’s consciousness and command them in battle.
Where to Find Slaves
Basic humanoid monsters can mostly be recruited. After learning the Qualitative Assessment at level 25, long press Q to see the character interface. Next to their name indicates whether they can be recruited as slaves; if not mentioned, they cannot.
In the starting maps of Claw and Firestone Barbarian camps, except for the boss, the rest of the minions can be recruited. These are the people of the two tribes.
In addition, humanoid creatures in the wilderness ruins, known as wanderers, can also be recruited.
Inside the Scout Camp, scouts cannot be recruited, but another barbarian can be recruited based on regional location, belonging to the corresponding tribal barbarians.
At the bottom left corner of the map, those humanoid creatures in bronze armor cannot be recruited.

How to Recruit
After learning Slave Summoning, attack a recruitable humanoid creature until they are at low health. The interface will display an Intimidate option by pressing E.
Notes
A common situation is when the health appears red but no interaction option is available. At this time, remove the weapon and switch to unarmed, then attack until a sliver of health remains. The interaction judgment can be tricky; sometimes 10% health will trigger it, sometimes it won’t, requiring even lower health.
After intimidating, a lying person will slowly increase loyalty. During this period, you need to replenish their health and feed them. Full satiety greatly accelerates loyalty growth.
To replenish health and satiety, open the inventory interface facing the slave, move bandages and food to the slave’s backpack, right-click to use, and restore them.
However, only unconscious people can eat fluid food, so you can only choose soup-type food. Therefore, prepare cooking pots in advance, such as meat soup, fish soup, or hematoma soup. Usually, two meat soups will fill them up.
Also, placing them on a bed increases loyalty growth to a certain extent.
Tips
- A slave can only follow or carry one at a time. Therefore, many players knock out one and carry it back, then grab another. My method is to grab two at once.
- Carry meat soup with you. After knocking out the first one, there is usually a bed in the tribe’s house. Carry them over and place them on the bed to replenish status, then clear the camp, and knock out the second one along the way.
- After clearing the camp, the loyalty of the first one is usually enough. You can recruit them directly, then carry the second one back. This way, you can take two at a time.
- If your home is close enough to the tribe, and you don’t worry about the slave dying on the way, you can even arrange a task for the slave after recruiting them, let them run home by themselves, and continue with other slaves. This way is more efficient without returning home.
How to Choose Slaves
A slave’s attributes consist of several parts:
- Faction-specific attributes
- Talent attributes
- Occupation and profession attributes
- Attribute growth
Faction-specific Attributes
Usually displayed as the first attribute of a slave’s properties.
For example, in the Firestone Tribe camp, slaves have resilience. The numerical value of resilience added at levels 1, 2, and 3 cannot be grown; it is born with them.
The Claw Tribe adds attack attributes, while wanderers do not have faction-specific attributes. I haven’t played with other factions like the Snake Tribe, so I don’t know yet.
Talent Attributes
These are the initial bonuses slaves are born with, some good and some bad. Choose according to your preference.
These attributes can be learned through continuous work, gaining new attributes, or removing debuff attributes. Therefore, after recruiting a slave, don’t let them idle; let them work continuously to improve their level and learn new attributes. (Note: Patrol slaves will only patrol and won’t gain experience or learn new attributes.)
Learning new attributes is random. Depending on the slave’s occupation and frequent tasks, there will be certain biases, but it’s not absolute.
For example, production slaves may also gain combat attributes, and planners for chefs may also gain weapon manufacturing attributes. Laborers will only gain laborer-type attributes, and artisans will only gain artisan attributes, but there is a chance to gain combat attributes.
If a combat occupation gains attributes that match their high proficiency weapon, that’s the best outcome, but it’s quite random. Often, a great sword slave may end up with an archery attribute, which is a waste.
Please note that although slave growth can remove debuffs, there is a type of debuff that, when you reach level 25 in the quality evaluation, and long press scan, some slaves will display a talent next to them. If this talent is a debuff, it cannot be removed.
Common initial attributes: for example, natural slaves in the production direction, planting masters, armor masters, natural luck, cooking masters, etc., are all good attributes. (Especially natural luck, which increases the chances of triggering all probabilistic event logs, and must be taken when encountered, regardless of other factors).
Combat-oriented Heartseers (trunk damage), weapon masters (attack speed), jungle killers (animal damage), etc.
Debuffs, such as famous trash, unfortunate people, if encountered, it is recommended to directly expel them, wasting space.
Professions and Profession Entries
Slaves are divided into several professions: laborer, miscellaneous worker, craftsman, hunter, guard, warrior, etc.
Each profession is further categorized into low-tier, mid-tier, and high-tier.
Professions primarily affect the initial efficiency of skill proficiency acquisition and the subsequent direction of acquiring new entries.
Refer to the proficiency chart above for different professions.
- Laborer: Impact on tasks such as logging, mining, harvesting, and planting, suitable for outdoor gathering work.
- Miscellaneous Worker: Impact on tasks such as weaving, pottery making, woodworking, leatherworking, and kiln firing, suitable for initial processing of survival materials indoors.
- Craftsman: Impact on tasks such as craftsmanship, alchemy, weapon, and armor making, suitable for advanced processing of finished products.
Combat professions have varied proficiency focuses:
- Hunter: Suitable for weapons with emphasis on willpower and agility.
- Warrior: Suitable for weapons with emphasis on strength or agility.
- Guard: Suitable for weapons with emphasis on strength or constitution.
However, these are not absolute rules as they also influence the types of combat entries acquired subsequently, such as bonus damage, bloodthirst, counterattack, etc.
Additionally, combat profession slaves have inherent skills like taunting, kicking, healing, attacking, etc., which production profession slaves lack.
Thus, production professions, even if they have combat entries, do not possess high combat value.
Before level 25, one can determine a slave’s profession based on the weapon they wield. For instance, slaves using hoes or picks are generally production professions like laborer or craftsman. Those wielding weapons are combat professions; dual-blade craftsmen are typically hunters, while maces and greatswords are likely guards or warriors.
Using the Firestone Tribe as an example, the east gate entrance has two vegetable gardens: the upper garden consistently yields laborers, and the lower garden yields laborers, miscellaneous workers, or craftsmen.
After level 25, with the introduction of quality assessment, you can directly see a slave’s profession displayed next to their name during scanning, which facilitates easier selection.
On the attribute interface, following the faction entries are several profession entries that determine the proficiency efficiency slaves gain in relevant tasks.
As for tiers, their current significance remains unclear; initially, it was thought they corresponded to levels 1, 2, and 3 of profession entries or the proficiency level cap. However, high-tier profession entries can sometimes start at level 1, while low-tier entries can start at level 3, or even include duplicate entries, effectively doubling proficiency efficiency. The proficiency level cap also varies widely, showing randomness, and I welcome insights from others in the comments to further understand this.
Proficiency efficiency isn’t overly crucial since there’s a level cap; proficiency will eventually max out. Therefore, it’s more important to consider the profession itself rather than whether it’s low-tier or high-tier.
Attribute Growth
After slaves level up, they gain freely assignable points and randomly increased points.
Sometimes, slaves of the same level can have attribute differences of several tens of points, which relates to slave quality.
Similar to equipment, slaves are classified into white, green, blue, yellow, and red qualities. Higher quality slaves gain more attribute points.
In production, willpower, strength, and agility respectively affect crafting efficiency, quantity, and gathering efficiency, though their individual importance may vary.
In combat, willpower affects bow and projectile damage, strength determines hammer and greatsword damage, and agility affects dual blades, spears, single blades, and fist weapon damage, significantly influencing outcomes.
Therefore, my recommendation:
- Production slaves: Quality isn’t critical; focus on entries. For example, a craftsman with a lucky entry that enhances product quality is more valuable than efficiency or quantity bonuses brought by attributes. If entries are not favorable, consider dismissal and continued search for entries.
- Combat slaves: Higher quality is preferable. Aim for red quality combat professions; lower quality slaves are not worth cultivating.
After level 25, quality can be assessed directly through scanning.
Before level 25, recruit laborers or miscellaneous workers from tribal gardens for household resource gathering and material production; quality is secondary.
Regarding combat professions, personal preference matters; during this stage, there’s little necessity for recruitment.
After level 25, prepare for subsequent reincarnated slaves; utilize quality assessment to choose slaves for capture.
After starting the quality scan, you can inspect each slave’s attributes one by one. Use the middle mouse button to mark the slaves you want, which helps avoid accidentally killing them.
During this phase, focus primarily on combat professions. My practice is to recruit only red-marked ones; for yellow-marked ones, consider keeping them if they have good attributes. For production professions, if you encounter high-level good attributes, consider replacing those with lower quality. However, if a low-quality attribute is good, there’s no need to replace it.
At the same time, strive for excellence in this phase, focusing mainly on proficiency levels. Since you can add points every 30 levels, it’s best for combat professions to retain only those with proficiency levels of 120 or higher in a specific weapon, as each additional bonus counts.
For production professions, only craftsmen involved in weapon or armor crafting affect the high-quality rate of products. It’s advisable to aim for proficiency levels of 120. As for other production slaves, I find it unnecessary to spend effort training them, as they contribute little to efficiency or product quality.
Number of Slaves
Laborers: Recommend four: one for mining, one for logging, one for grass cutting, and one for planting. Typically, I assign tasks to them while also setting up storage for all related products, usually around 4 to 5. Part-timers tend to extend their task lists unnecessarily long. I provide about ten tools in their backpacks, so I assign full-time roles for these three. If a type of resource is missing a box, you can stop working.
Miscellaneous Workers: Of little value, as upgrading slaves require work. I generally assign work to upgrading slaves, eliminating the need for dedicated miscellaneous workers.
Craftsmen: Usually just one for crafting weapons and armor, as one is enough for production. If you find craftsmen with proficiency levels of 120 in both weapon and armor crafting, you can retain them. For cooks, upgrading them to do the work is acceptable. The quality of craftsmen is negligible; as for proficiency, focus on durability. For example, for novice maps, the bonus is for bronze leather quality, and the rest is durability. After switching to advanced maps, this slave can be replaced. Proficiency is replaced by iron quality, and the rest adds durability.
Combat Professions: The more the better. After level 25, slaves with combat professions are more productive; as long as they have red or yellow attributes and a proficiency level of 120 or higher, it is recommended to keep them. Those with good attributes can be stationed at home for standby, acting as substitutes in the future. Those with less favorable attributes can be trained to higher levels, equipped, and sent out for patrols to protect your outdoor gathering slaves. To prevent route collisions and jams in the patrol team, I typically assign two to three individuals per route.
Slave Usage Notes:
- At any campfire or bonfire, batch slave tasks can be set, and you can also view the tribal slave list. The list displays the attributes of each slave.
- After recruiting slaves, it’s advisable to rename them based on their future development direction for easier task arrangement or follow-up settings. Default names like “XX Slave” can clutter the list, making it difficult to identify.
- For gathering slaves, keep extra tools in their bags. Occasionally check tool durability; I typically use stone tools, making it convenient to repair when passing by. Tools above bone quality need to be taken home to the workbench for repairs. Also, if a gathering and storage task is set and a slave is idle, check the task list for reasons such as lack of materials, missing tools, or full inventory. Handle accordingly.
- For other production slaves, I don’t recommend using cyclic production tasks as they interfere with other tasks at the same workbench. Cyclic production tasks often lead to marginal differences and material waste. It’s better to set several 999 production tasks. I dislike using cycles, but of course, if you can’t stand a slave idling, consider it.
- Remember to allocate attribute points and proficiency bonuses to slaves. You can view the family photos of all your slaves according to the J Clan list (I complain here; the interface is too dark and the mouse-over judgment points are sometimes too small to select). Go into each slave’s individual operation page to allocate points. You can also view the slave’s attribute attributes here.
- Allocate attribute points according to their development direction. For proficiency, for production slaves specializing in production, it’s recommended to increase output. For those not specializing, focus on leveling, e.g., combat slaves practicing woodworking, allocate efficiency points to woodworking proficiency.
- For weapon and armor crafting, it’s advisable to rotate. For example, early on, aim for bronze weapon quality, then focus on durability bonuses. Later, switch slaves as you change maps.
- Personally, for every slave recruited, I equip them with a water bottle, around 40 grilled meats, and 30 bandages. This prevents them from crowding around the box for food. If conditions allow, use premium bandages for patrol teams; the AI only uses bandages when their health is below a certain level, so basic bandages may not fully heal.
- Many people habitually suicide with their main character to return to the city, enabling quick travel between bases. However, controlling slaves this way can easily lead to their deaths. Until you learn how to revive slaves, such actions can result in losing a well-trained high-quality slave, so be cautious.
- Similarly, avoid using slaves for invasions or dangerous activities like mining in caves, as it risks losing them. Disposable slaves dying isn’t as painful, so feel free to take risks. Mining is similar; several times, elite monsters in caves killed the substitute slaves I had trained. Unless you’re confident in the cave’s strength, I don’t recommend risking substitute slaves.
- Control slaves for boss fights. When stuck on a boss, training a fully proficient slave to fight can be highly efficient. For example, use a sledgehammer for relic bosses and dungeon bosses; 90 proficiency is usually sufficient for soloing them. Blade beasts are best handled with dual blades; my 120 full resilience dual blades can handle it without difficulty.
- Slave deployment in battles is rare for me. However, if you encounter slaves with damage reduction attributes for deployment, consider using them to help early game camp bosses. Even at full level, they often can’t handle elite leopards. Alternatively, you can shield them in front and supplement damage from a distance. How you use them is up to you.